With the rapid development of electronic equipment, automobiles and other electronic technologies, the market demand for wire harnesses continues to grow. At the same time, it also places higher requirements on functions and quality such as miniaturization and lightweight.
The following will introduce you to the necessary appearance inspection items to ensure the quality of wire harnesses. It also introduces application cases of using the new 4K digital microscope system to achieve magnified observation, measurement, detection, quantitative evaluation and improvement of work efficiency.
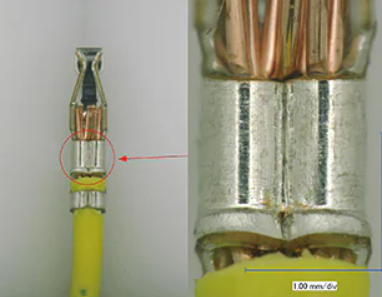
Wire harnesses whose importance and requirements are growing simultaneously
A wiring harness, also known as a cable harness, is a component formed by bundling multiple electrical connection (power supply, signal communication) wiring required to connect electronic equipment into a bundle. Using connectors that integrate multiple contacts can simplify connections while preventing misconnections. Taking cars as an example, 500 to 1,500 wiring harnesses are used in a car, and these wiring harnesses can play the same role as human blood vessels and nerves. Defective and damaged wiring harnesses will have a great impact on the quality, performance and safety of the product.
In recent years, electrical products and electronic equipment have shown a trend of miniaturization and high density. In the automotive field, technologies such as EV (electric vehicles), HEV (hybrid vehicles), driving assistance functions based on induction technology, and autonomous driving are also is developing rapidly. Against this background, the market demand for wire harnesses continues to grow. In terms of product research, development and manufacturing, we have also entered the pursuit of diversification, miniaturization, lightweight, high functionality, high durability, etc., striving to meet A new era of various needs. In order to meet these needs and quickly provide high-quality new and improved products, evaluation during research and development and appearance inspection during the manufacturing process must meet higher accuracy and speed requirements.
The key to quality, wire terminal connection and appearance inspection
In the manufacturing process of wire harnesses, before assembling connectors, wire tubes, protectors, wire clamps, tightening clamps and other components, an important process that determines the quality of the wire harness needs to be carried out, that is, the terminal connection of the wires. When connecting terminals, "crimping (caulking)", "pressure welding" and "welding" processes are used. When using various connection methods, once the connection is abnormal, it may lead to faults such as poor conductivity and core wire falling off.
There are many ways to detect the quality of wire harnesses, such as using a "wire harness checker (continuity detector)" to check whether there are electrical disconnections, short circuits and other problems.
However, in order to detect the specific status and causes after various tests and when failures occur, it is necessary to use the magnifying observation function of the microscope and microscopic system to perform visual inspection and evaluation of the terminal connection part. The appearance inspection items for various connection methods are as follows.
Appearance inspection items for crimping (caulking)
Through the plasticity of the copper-clad conductors of various terminals, the cables and sheaths are crimped. Using tools or automated equipment on a production line, the copper-clad conductors are bent and connected by "caulking."
[Appearance inspection items]
(1) Core wire protrudes
(2) Core wire protruding length
(3) Amount of bell mouth
(4)Sheath protruding length
(5) Cutting length
(6)-1 bends upward/(6)-2 bends downward
(7)Rotation
(8)Shaking
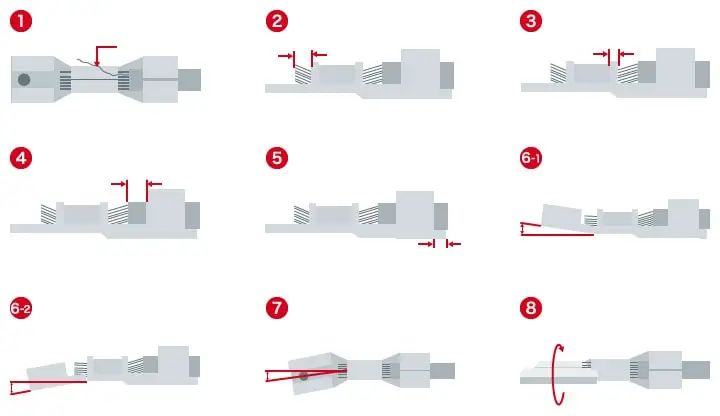
Tips: The criterion for judging the crimping quality of crimped terminals is "crimping height"
After the terminal crimping (caulking) is completed, the height of the copper-clad conductor section at the crimping point of the cable and sheath is the "crimping height". Failure to perform crimping according to the specified crimping height may result in poor electrical conductivity or cable detachment.

A crimp height higher than specified will result in "under-crimping," where the wire will come loose under tension. If the value is lower than the specified value, it will lead to "excessive crimping", and the copper-clad conductor will cut into the core wire, causing damage to the core wire.
The crimping height is only a criterion for inferring the condition of the sheath and core wire. In recent years, in the context of the miniaturization of wire harnesses and the diversification of materials used, quantitative detection of the core wire condition of the crimp terminal cross-section has become an important technology in order to comprehensively detect various defects in the crimping process.
Appearance inspection items of pressure welding
Tuck the sheathed wire into the slit and connect it to the terminal. When the wire is inserted, the sheath will contact and be pierced by the blade installed at the slit, creating conductivity and eliminating the need to remove the sheath.
[Appearance inspection items]
(1) The wire is too long
(2) The gap at the top of the wire
(3) The conductors protruding before and after the soldering pads
(4) Pressure welding center offset
(5) Defects in the outer cover
(6) Defects and deformation of the welding sheet
A: outer cover
B: Welding sheet
C: Wire
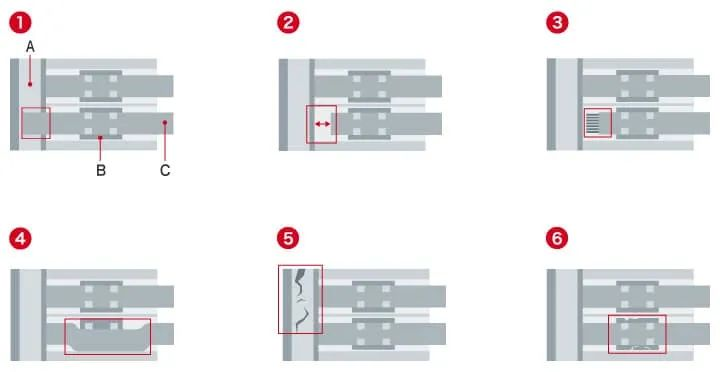
Welding appearance inspection items
Representative terminal shapes and cable routing methods can be divided into "tin slot type" and "round hole type". The former passes the wire through the terminal, and the latter passes the cable through the hole.
[Appearance inspection items]
(1) Core wire protrudes
(2) Poor conductivity of solder (insufficient heating)
(3) Solder bridging (excessive soldering)

Application cases of wire harness appearance inspection and evaluation
With the miniaturization of wire harnesses, appearance inspection and evaluation based on magnified observation are becoming more and more difficult.
Keyence's ultra-high-definition 4K digital microscope system "can significantly improve work efficiency while achieving high-level magnification observation, appearance inspection and evaluation."
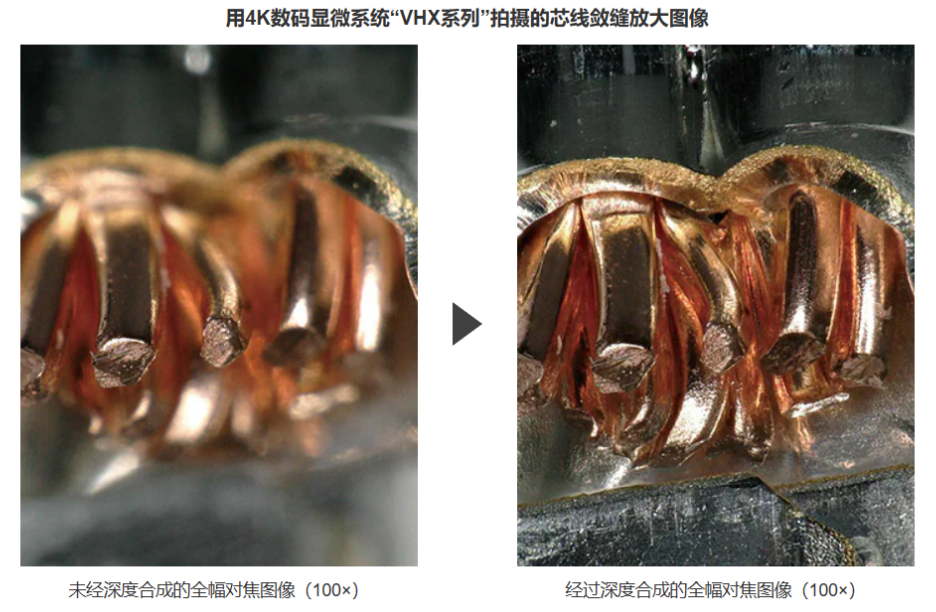
Depth synthesis of full-frame focus on three-dimensional objects
The wire harness is a three-dimensional object and can only be focused locally, making it difficult to carry out comprehensive observation and evaluation covering the entire target object.
The 4K digital microscope system "VHX series" can use the "navigation real-time synthesis" function to automatically perform depth synthesis and capture ultra-high-definition 4K images with full focus on the entire target, making it easy to carry out correct and efficient magnification observation, appearance inspection and Evaluate.
Warp measurement of wire harness
When measuring, not only a microscope must be used, but also a variety of other measuring instruments must be used. The measurement process is cumbersome, time-consuming and labor-intensive. In addition, the measured values cannot be directly recorded as data, and there are certain problems in terms of work efficiency and reliability.
The 4K digital microscope system "VHX series" is equipped with a variety of tools for "two-dimensional dimensional measurement". When measuring various data such as the angle of the wire harness and the cross-section crimping height of the crimped terminal, the measurement can be completed with simple operations. Using the "VHX Series", you can not only achieve quantitative measurements, but also save and manage data such as images, numerical values, and shooting conditions, significantly improving work efficiency. After completing the data saving operation, you can still select past images from the album to perform additional measurement work on different locations and projects.
Measuring wire harness warpage angle using 4K digital microscope system "VHX series"
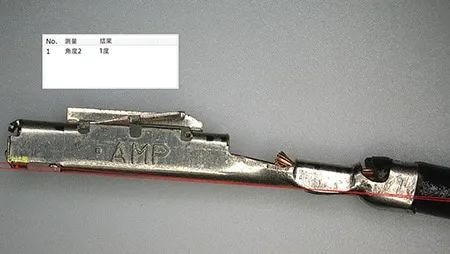
Using "2D Dimension Measurement"'s diverse tools, you can easily complete quantitative measurements by just clicking on the right angle.
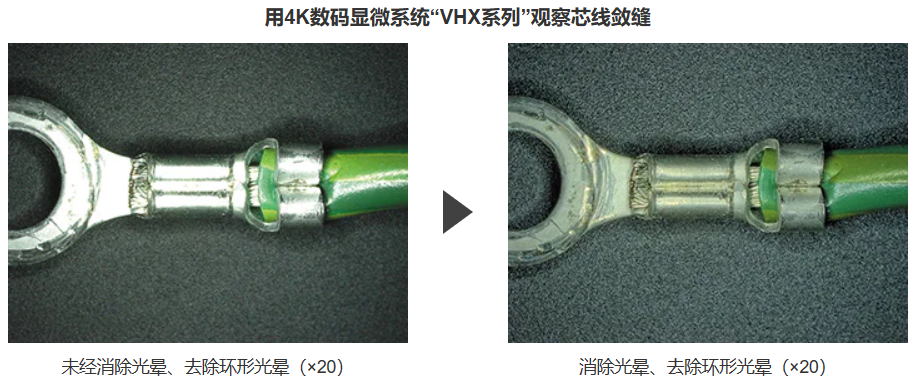
Observation of core wire caulking not affected by metal surface gloss
Affected by the reflection from the metal surface, observation may sometimes occur.
The 4K digital microscope system "VHX series" is equipped with "halo elimination" and "annular halo removal" functions, which can eliminate reflection interference caused by the gloss of the metal surface and accurately observe and grasp the caulking state of the core wire.
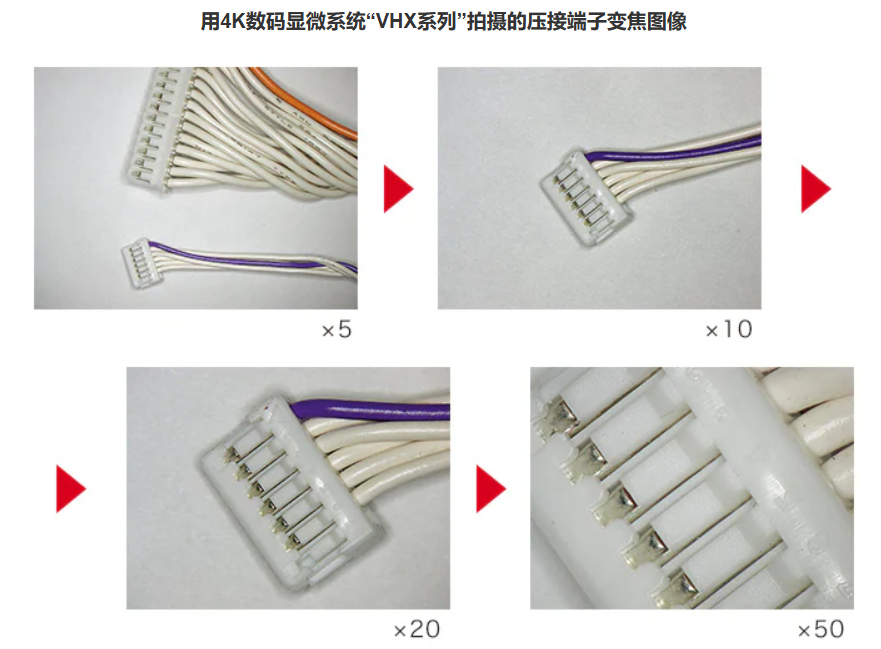
Zoom shot of the caulking part of the wiring harness
Have you ever experienced that it is difficult to accurately focus on small three-dimensional objects such as wire harness caulking during appearance inspection? This makes it very difficult to observe small parts and fine scratches.
The 4K digital microscope system "VHX Series" is equipped with a motorized lens converter and a high-resolution HR lens, capable of automatic magnification conversion from 20 to 6000 times to achieve "seamless zoom." Just perform simple operations with the mouse or controller at hand, and you can quickly complete the zoom observation.
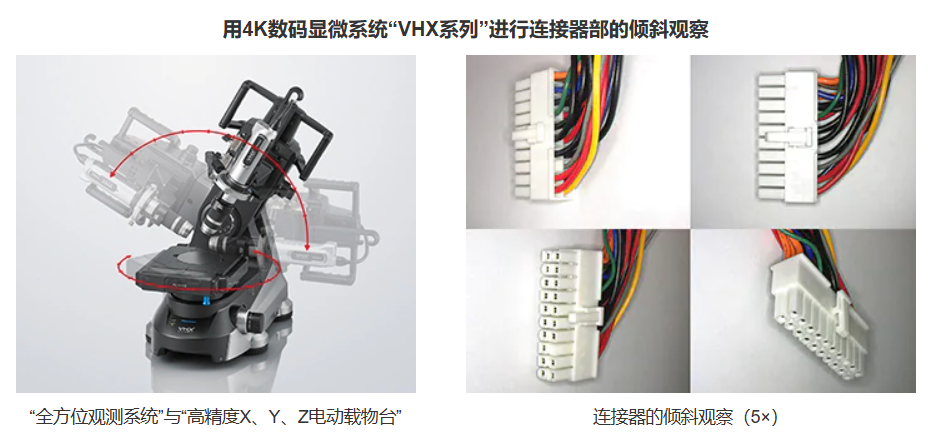
An all-round observation system that realizes efficient observation of three-dimensional objects
When observing the appearance of three-dimensional products such as wire harnesses, the operation of changing the angle of the target object and then fixing it must be repeated, and the focus must be adjusted separately for each angle. Not only can it only focus locally, it is also difficult to fix, and there are angles that cannot be observed.
The 4K digital microscope system "VHX series" can utilize the "all-round observation system" and the "high-precision X, Y, Z electric stage" to provide support for flexible movements of the sensor head and stage that are not possible with some microscopes. .
The adjustment device allows easy adjustment of three axes (field of view, rotation axis, and tilt axis), allowing observation from various angles. Moreover, even if it is tilted or rotated, it will not escape the field of view and keep the target in the center. This greatly improves the efficiency of observing the appearance of three-dimensional objects.
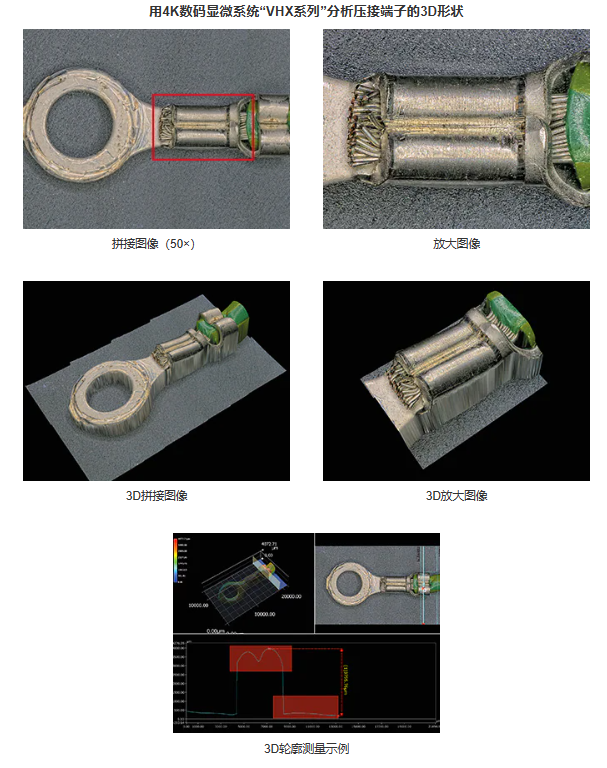
3D shape analysis that enables quantitative evaluation of crimp terminals
When observing the appearance of crimped terminals, it is not only necessary to focus locally on the three-dimensional target, but there are also problems such as missed abnormalities and human evaluation deviations. For three-dimensional targets, they can only be evaluated through two-dimensional dimensional measurements.
The 4K digital microscope system "VHX series" can not only use clear 4K images for magnified observation and two-dimensional size measurement, but can also capture 3D shapes, perform three-dimensional size measurement, and perform contour measurement on each cross-section. The analysis and measurement of the 3D shape can be completed through simple operations without the user's skillful operation. It can simultaneously achieve advanced and quantitative evaluation of the appearance of crimped terminals and improve the efficiency of the operation.
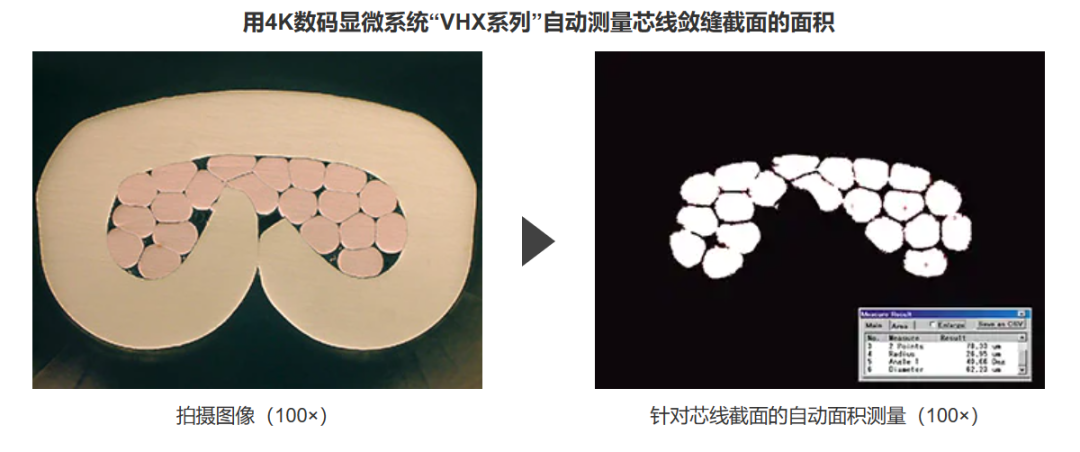
Automatic measurement of caulked cable sections
The 4K digital microscope system "VHX series" can use a variety of measurement tools to easily complete various automatic measurements using captured cross-sectional images.
For example, as shown in the figure below, it is possible to automatically measure only the core wire area of the core wire crimped cross section. With these functions, it is possible to quickly and quantitatively detect the core wire condition of the caulking part that cannot be grasped by crimping height measurement and cross-sectional observation alone.
New tools to quickly respond to market needs
In the future, the market demand for wire harnesses will be increasing. In order to meet the rising market requirements, new research and development, quality improvement models and manufacturing processes must be established based on fast and accurate detection data.
Post time: Dec-26-2023

